How to add Dynamic fields in Magento 2 system.xml configuration

Welcome to Kishan Savaliya's Magento 2 Blog.In this blog post, I will show you how to add Dynamic fields in Magento 2 system.xml configuration. System Configuration is very useful feature in Magento 2, by using that admin user can easily manage settings.
While developing Magento 2 module, whenever we need to provide system configuration for admin user to manage complex data at that time dynamic fields will be useful. Using dynamic UI component fields admin user can insert new data, update any existing fields or if they don't want any rows data then they can easily manage that through system configuration.
Here we will create one example of system configuration where we will provide input field and one dropdown. So let's start.
I'm guessing you have your custom module, so go to your Magento 2 root directory and navigate inside your module's etc/adminhtml/ directory.
app/code/SK/DynamicFields/etc/adminhtml/system.xmlContent for this file is..
<?xml version="1.0"?>
<!--
/**
 * @package   SK\DynamicFields
 * @author    Kishan Savaliya <kishansavaliyakb@gmail.com>
 */
-->
<config xmlns:xsi="http://www.w3.org/2001/XMLSchema-instance" xsi:noNamespaceSchemaLocation="../../../Config/etc/system_file.xsd">
    <system>
        <tab id="sk_dynamic_fields" translate="label" sortOrder="15">
            <label><![CDATA[SK]]></label>
        </tab>
        <section id="sk_configuration" translate="label" type="text" sortOrder="1" showInDefault="1" showInWebsite="1" showInStore="1">
            <label>Configuration</label>
            <tab>sk_dynamic_fields</tab>
            <resource>SK_DynamicFields::config</resource>

            <!-- Dynamic Fields System Configuration -->
            <group id="dynamic_field_group" translate="label" type="text" sortOrder="1" showInDefault="1" showInWebsite="1" showInStore="1">
                <label>Dynamic Fields Group</label>
                <field id="dynamic_field" translate="label" type="text" sortOrder="1" showInDefault="1" showInWebsite="1" showInStore="1">
                    <label>Dynamic Fields</label>
                    <backend_model>SK\DynamicFields\Config\Backend\ArraySerialized</backend_model>
                    <frontend_model>SK\DynamicFields\Block\Adminhtml\Config\Form\Field\DynamicFields</frontend_model>
                    <comment>sk_configuration/dynamic_field_group/dynamic_field</comment>
                </field>
            </group>
            <!-- Dynamic Fields System Configuration -->
        </section>
    </system>
</config>
Here in above file, I used <backend_model> and <frontend_model>, that both components needed whenever we want to create any custom system configuration fields.
So, let's create Backend Model file, is used for fields data preparation before saving that configuration field and after loading.
app/code/SK/DynamicFields/Config/Backend/ArraySerialized.phpContent for this file is.
<?php
/**
 * @package   SK\DynamicFields
 * @author    Kishan Savaliya <kishansavaliyakb@gmail.com>
 */

namespace SK\DynamicFields\Config\Backend;

use Magento\Framework\App\Config\Value as ConfigValue;
use Magento\Framework\Model\Context;
use Magento\Framework\Registry;
use Magento\Framework\App\Config\ScopeConfigInterface;
use Magento\Framework\App\Cache\TypeListInterface;
use Magento\Framework\Model\ResourceModel\AbstractResource;
use Magento\Framework\Data\Collection\AbstractDb;
use Magento\Framework\Serialize\SerializerInterface;

class ArraySerialized extends ConfigValue
{
    protected $_serializer;

    public function __construct(
        Context $context,
        Registry $registry,
        ScopeConfigInterface $config,
        TypeListInterface $cacheTypeList,
        AbstractResource $resource = null,
        AbstractDb $resourceCollection = null,
        SerializerInterface $serializer,
        array $data = []
    ) {
        $this->_serializer = $serializer;
        parent::__construct($context, $registry, $config, $cacheTypeList, $resource, $resourceCollection, $data);
    }

    public function beforeSave()
    {
        $value = $this->getValue();
        unset($value['__empty']);
        $encodedValue = $this->_serializer->serialize($value);
        $this->setValue($encodedValue);
    }

    protected function _afterLoad()
    {
        $value = $this->getValue();
        if ($value)
        {
            $decodedValue = $this->_serializer->unserialize($value);
            $this->setValue($decodedValue);
        }
    }
}
Now, create Frontend Model file, is used to render view element.
app/code/SK/DynamicFields/Block/Adminhtml/Config/Form/Field/DynamicFields.phpContent for this file is..
<?php
/**
 * @package   SK\DynamicFields
 * @author    Kishan Savaliya <kishansavaliyakb@gmail.com>
 */

namespace SK\DynamicFields\Block\Adminhtml\Config\Form\Field;

use Magento\Config\Block\System\Config\Form\Field\FieldArray\AbstractFieldArray;
use Magento\Framework\DataObject;

class DynamicFields extends AbstractFieldArray
{
    private $_dropdownFieldRenderer;

    protected function _prepareToRender()
    {
        $this->addColumn(
            'text_field',
            [
                'label' => __('Text Field'),
                'class' => 'required-entry'
            ]
        );
        $this->addColumn(
            'email_field',
            [
                'label' => __('Email'),
                'class' => 'required-entry validate-email'
            ]
        );
        $this->addColumn(
            'dropdown_field',
            [
                'label' => __('Dropdown Field'),
                'renderer' => $this->getDropdownFieldRenderer(),
                'class' => 'required-entry'
            ]
        );
        $this->_addAfter = false;
        $this->_addButtonLabel = __('Add New Row');
    }

    protected function _prepareArrayRow(DataObject $row)
    {
        $options = [];
        $dropdownField = $row->getDropdownField();
        if ($dropdownField !== null)
        {
            $options['option_' . $this->getDropdownFieldRenderer()->calcOptionHash($dropdownField)] = 'selected="selected"';
        }
        $row->setData('option_extra_attrs', $options);
    }

    private function getDropdownFieldRenderer()
    {
        if (!$this->_dropdownFieldRenderer)
        {
            $this->_dropdownFieldRenderer = $this->getLayout()->createBlock(
                CustomOptions::class,
                '',
                ['data' => ['is_render_to_js_template' => true]]);
        }
        return $this->_dropdownFieldRenderer;
    }
}
Here in above file, I added 3 columns 2 text type and 1 dropdown field, so for dropdown I used Renderer and for dropdown options I used CustomOptions Block file to collect options. So let's create that file here..
app/code/SK/DynamicFields/Block/Adminhtml/Config/Form/Field/CustomOptions.phpContent for this file is..
<?php
/**
* @package SK\DynamicFields
* @author Kishan Savaliya <kishansavaliyakb@gmail.com>
*/
namespace SK\DynamicFields\Block\Adminhtml\Config\Form\Field;
use Magento\Framework\View\Element\Html\Select;
class CustomOptions extends Select
{
public function setInputName($value)
{
return $this->setName($value);
}
public function setInputId($value)
{
return $this->setId($value);
}
public function _toHtml()
{
if (!$this->getOptions())
{
$this->setOptions($this->getDropdownOptions());
}
return parent::_toHtml();
}
private function getDropdownOptions()
{
$options = [
['label' => 'Option 1', 'value' => '1'],
['label' => 'Option 2', 'value' => '2'],
['label' => 'Option 3', 'value' => '3'],
['label' => 'Option 4', 'value' => '4'],
['label' => 'Option 5', 'value' => '5'],
];
return $options;
}
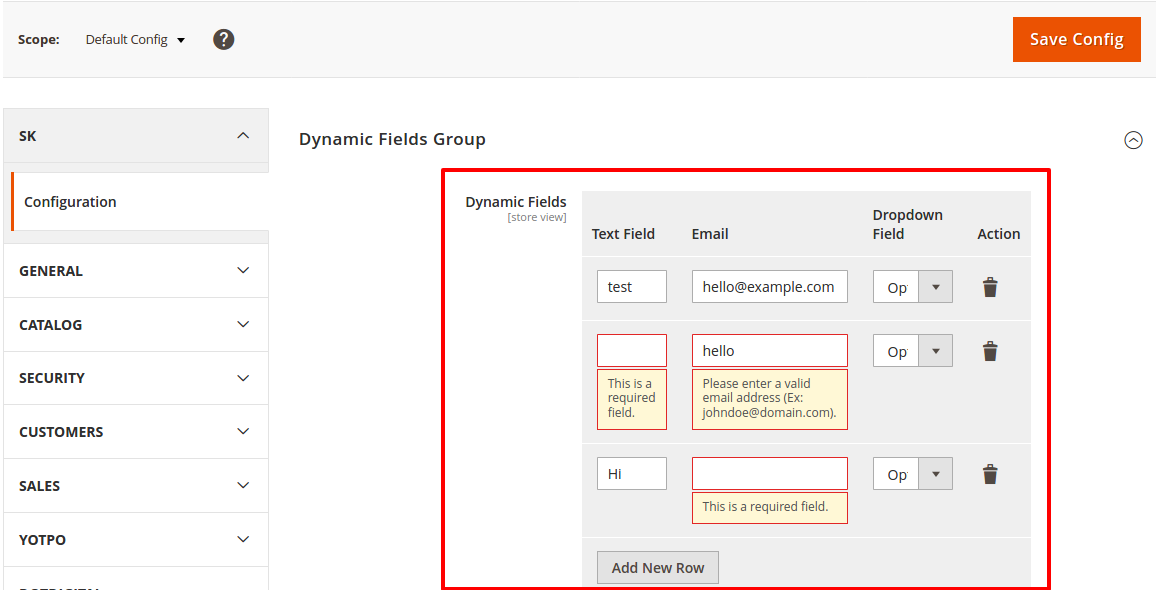
}Now, run below command once and open backend and Navigate to Store > Settings > Configuration and find your tab and check output.
php bin/magento setuup:upgradeOutput :
Hope you may like this article and can understand this easily. You can add comments below in case if you have any questions regarding this article or if I missed anything here. I will check and get back to you with proper solution.
If you enjoyed this blog post, share it with friends!